Posts

Building Our First App In Android Studio

Image
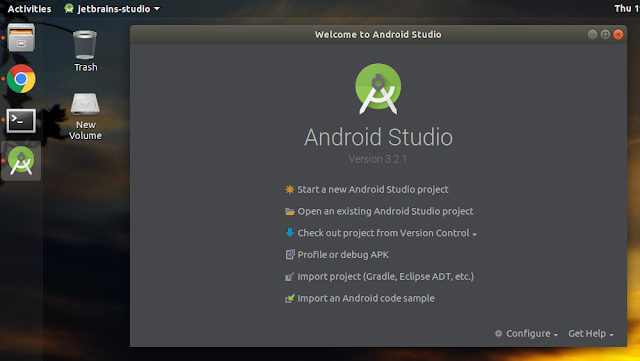
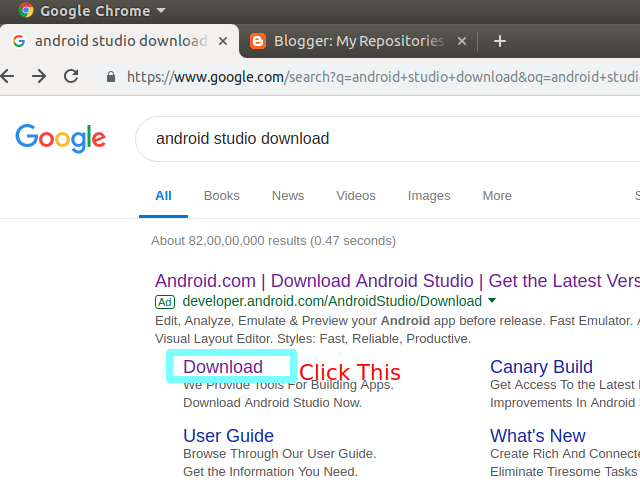
1. Open Android Studio. If you haven't downloaded it then refer to this post. 2. Now Click on "Start a new Android Studio Project" option and you will get the following window. 3. Fill the application name and write any company domain even if doesn't exist and then if you want to change the project destination folder, then change it through "project location" option and then click on next and you will encounter following window. 4. Click on phone and tablet and select the API level (It is basically Android version, API stands for Android Programming Interface) and then click next and you will see the following window 5. Select empty activity and click next. 6. Now give a name to your "activityname" or leave it as it is. (An activity is an application component that provides a screen with which users can interact) . When you click on next you will see that in lowermost section build sync will be going on and when it

Setting Up Android Studio In Ubuntu

Image
1. First of all, Search Android Studio download on your browser's search bar and then select download option. 2. Now Download Link will appear. Click Download option and android studio will be downloaded. 3. Now extract the file and place it in home directory. 4. Now open that file and go to bin folder or in other words go to android studio->bin 5.  Right Click their and choose the option "Open With Terminal". You will see the following window 6. Now type " ./studio.sh " in that terminal. (./ is used to open any file in that directory)         7. Android studio will be opened and follow the instructions and download the tools needed and have happy programming.

Installing Linux By Removing Windows

Image
So, In this post we will be installing Ubuntu (A Linux distribution) and removing windows. Requirements-  Pen drive with atleast 4 GB of storage As you are reading this post so, I may expect that you have an internet connection. 1. Go to  ubuntu.com 2. Click the  download  section and under UBUNTU DESKTOP select  18.04 LTS 3. While the file is getting downloaded, we will download a software that converts our ubuntu file into a bootable file. 4. Type  ETCHER  in your search bar and then go to first link. 5. Then there will be a download option. Click it and the file will be downloaded. 6. Now open the etcher setup and install it. After the installation is over, run it. It would look something like this 7. Now plug your pendrive and format it. 8. Now in select image option select your ubuntu file and in select drive select your pendrive and hit the flash button. 9. After the pendrive gets flashed restart the computer. 10. Restart

Removing Ubuntu From Dual Boot

Image
If you think that ubuntu is not for you then you can delete ubuntu permanently by following steps:- 1. Open the disc management by right clicking on windows icon and then selecting disc management. 2. Now select the disc in which you have installed ubuntu. 3. Choose the partition in which you have installed ubuntu. In my case it is Disk 1 Partition 2  4. Now right click it and choose delete volume. 5. Now you will notice that the partition will become unallocated 7. Now choose the other healthy partition and then right click it and choose extend volume and then extend the whole unallocated memory. 8. Now we will fix the grub 9. Restart the computer and as soon as screen wakes up again press F2 to enter bios settings. 10. Select Boot tab by right arrow key 11. Now, under boot priority order we will see that ubuntu is on first. So change the values by pressing F6 to make windows boot manger on first. 12. Save your changes by pressing F10 and e

C Under Linux

Image
To run a c program in linux follow these steps 1. Open the terminal by clicking Ctrl+Alt+T 2. Now, write gcc-v or gcc --version. If it gives you the version then gcc is installed. Otherwise write sudo apt-get install gcc to install gcc 3. Now gcc will be installed. Now to write a simple program open the terminal again 4. Write cd Desktop/ in the terminal.(cd is used to change the directory. Now we are in desktop directory.) 5. Write touch hello.c in the terminal and you will see that the file will be created in the desktop. 6. Now write your c program in hello.c and save the changes.Don,t close the terminal. 7. now write gcc hello.c -o test in the terminal and you will see that a file name test will be installed. Instead of test you can choose any file name. 8. Run the file test by typing ./test in the terminal . You will see your output in the terminal.

Fixing The Ubuntu Freeze

This post is for those whose  1. Ubuntu Installation freezes  2. Ubuntu Login screen freezes (Skip First paragraph)   If your ubuntu installation freezes as soon as you have installation window then force shut down your system by long pressing the power key and then again power on your system. Now when the boot menu appears, scroll to "install ubuntu" option using arrow keys (Dont click it , only scroll it) and then press ' e ' and then you will see a line starting with linux. In that line replace " quiet splash " with nomodeset and then press F10 to save changes and then install ubuntu as per the instructions. When you will be asked for a reboot after the installation then your login screen will again freeze. So force shut down your pc and again start it. When you encounter grub (boot loader where you have option to select windows boot manager or ubuntu) scroll to ubuntu option and press 'e'. Now you will see various set of instructions. T

Dual Booting Linux And Windows

Image
 So, In this post we will be dual booting Ubuntu (A Linux distribution) alongside windows. Requirements- Pen drive with atleast 4 GB of storage As you are reading this post so, I may expect that you have an internet connection. Steps 1. Go to ubuntu.com 2. Click the download section and under UBUNTU DESKTOP select 18.04 LTS 3. While the file is getting downloaded, we will download a software that converts our ubuntu file into a bootable file. 4. Type ETCHER in your search bar and then go to first link. 5. Then there will be a download option. Click it and the file will be downloaded. 6. Now open the etcher setup and install it. After the installation is over, run it. It would look something like this 7. Now plug your pendrive and format it. 8. Now in select image option select your ubuntu file and in select drive select your pendrive and hit the flash button. 9. After the pendrive gets flashed we will have to reserve memory in the